Bouillon strainers (or Chinois) are simply any cone shaped strainer with very fine metal mesh. They are traditionally used to strain sauces and soups to produce a smooth texture. This fine stainless steel mesh also makes them a great choice for your yogurt strainer. To see more uses for the Chinois check out the Wiki page here.
The Matfer Exoglass Bouillon Strainer
Matfer is a French cookware company that’s been serving the US for over 25 years. Generally speaking, its products are among the higher end cookware. Most offerings are field tested in commercial kitchens before hitting the market. As a result they are very durable, easy to clean, and ergonomic products. The Matfer Exoglass Bouillon Strainer
is no exception receiving high customer ratings on Amazon.
Construction
Their Exoglass composite material (any part of the strainer that’s black) goes around the rim of the cone and extends over the handle. This material is durable, temperature stable up to 430 degrees F, and easy to clean. The cone-shaped wire mesh is constructed of food grade stainless steel. This stainless steel wire mesh is sealed into the Exoglass material around the rim of the strainer.
Note: Other brands use a different method for securing the mesh to the strainer. The mesh is made into a cone shape. A metal loop is placed on the inside of this cone near the rim. A second metal loop is placed on the outside of the cone near the rim. These two loops are then clamped together, securely holding the mesh in place. This allows for bacteria to become trapped between the metal pieces which isn’t ideal for a yogurt strainer.
The Matfer strainer also has two cross wires that follow the contour of the mesh. This helps protect the mesh when setting the strainer on its side or storing it with other cookware.
How to Use as a Yogurt Strainer
Support the strainer so that it’s elevated of above your kitchen counter. This can be done by setting the strainer in a deep cooking pot. The strainer has two hooks that can rest on the rim of the pot. Another option is to buy the Matfer strainer stand which has a wire loop the strainer can sit in. And a third option is to place the strainer in a large water pitcher letting the cross wires rest against the rim of the water pitcher.
After the yogurt has cultured, gently place the yogurt in the strainer using a ladle. Try to put each scoop of yogurt directly on top of the previous scoop rather than letting is slide down the side of the strainer. The less you disturb the yogurt, the faster it will stain. The liquid whey will drain out, leaving the coagulated milk proteins behind. To get your desired thickness, you can either time the straining or measure the volume of whey that’s released.
PS, check out our Greek page if you’re interested in making Greek yogurt!
Original article and pictures take www.yogurtstartercultures.com site
The Yogourmet yogurt starter gets its own page because it is such a popular product. The company has been around since 1983 and even makes its own yogurt maker. It receives high customer ratings for its reliability and consistency in texture and taste. Yogourmet makes a standard yogurt starter and a probiotic yogurt starter.
and it’s their most popular. In addition to the usual L. bulgaricus and S. thermophilus strains, it also contains L. acidophilus. This is a strain frequently used in probiotic pills and known to reduce lactose in yogurt.
To make the standard version your ferment at about 110 degrees F. One thing that makes this version popular is a very short culture time of only 4 – 4 1/2 hours.
contains the same three bacteria strains mentioned above. However, for this product they also add two more strains: L.casei and B.longum. These additional strains are associated with boosting the immune system and regularity of food transit (source: Yogourmet).
Preparation for this starter is a little different than the standard product. The starter is added to milk at 73 – 77 degrees F. Then gradually heated up to about 110 degrees F over the course of 9 to 15 hours.
Yogourmet recommends their yogurt maker for this but other methods such as an oven or heating pad will work as well. Basically place the yogurt in an environment where the top temperature is 110 degrees F.
Taste and Texture
Both Yogourmet starters tend to produce a creamy texture. The taste of the regular may be a little more tart than probiotic variety.
Conslusion
Both products are a great source of probiotic bacteria. If you’re looking for a broader range of beneficial bacteria then you want to go with their probiotic starter. However, the standard version may be more desirable for those following the SCD diet.
You can make 3 or so batches of the standard yogurt in the time it takes to make 1 probiotic batch. However, many people let their yogurt culture overnight and don’t consider this a problem.
Both yogurt starters are very popular and reliable so you can’t go wrong with either one! The following table is a summary of the differences between these two awesome starters:
Standard
Probiotic
taste
mildly tart: little more tart than probiotic version
mildly tart
texture
creamy
creamy
strains
L. Bulgarius, S. Thermophilus, L. Acidophilus
L. Bulgaricus, S. Thermophilus, L. Acidophilus, L. Casei, B. Longum
fermentation time
4 - 4 1/2 hours
9 - 15 hours
fermentation temperature
108 - 110 degrees F
initial: 73 - 77 degrees F final: 108 - 110 degrees F
Original article and pictures take www.yogurtstartercultures.com site
Yogourmet is well known for production of top selling and highly rated yogurt starters. And just like their yogurt products, Yogourmet Kefir Starter is one of the most popular in the kefir category as well. With over three decades of experience, Yogourmet produces a potent kefir starter that gives customers the highest chance of success for each batch.
What is Kefir?
Kefir is a fermented milk beverage that originated in Russia and Central Asian countries. It was brought to the US in the early 1900s and has been growing in popularity ever since (source: Wiki). Kefir starter is a combination of yeast and bacteria used to ferment milk. Traditionally this starter is used with cow, goat, or sheep milk. The combination of yeast and bacteria produce a consistency similar to thin, drinkable yogurt.
to a milk of your choice. Kefir ferments at room temperature between 68 to 77 degrees F. The ideal length of fermentation time for kefir is about 24 hours. Ideally the kefir should ferment in a closed container that’s not exposed to light. The combination of yeast/bacteria found in kefir is very robust. As a result, some kefir can be saved from each batch to start a new batch.
Taste/Texture
The bacteria in kefir ferment the milk sugar called lactose. Two of the byproducts of this fermentation are lactic acid and kefiran. Lactic acid contributes to a mildly sour taste while kefiran imparts a creamy texture. These beneficial bacteria also produce other acid byproducts which give kefir a buttery flavor. Much like yogurt, increasing fermentation time will increase lactic acid and result in more of a tart flavor.
Yeast ferment the lactose as well, but their byproducts are alcohol and carbon dioxide. The alcohol is typically only 0.2 – 2% which make it hard to taste in the final produce. The carbon dioxide can impart natural carbonated texture to this beverage.
Figuring out which starter to use can seem tricky at first but once you decide on some basics it’s fairly easy. The following figure shows the breakdown of yogurt starter classes.
Note: the Greek yogurt starter on this site is indeed an heirloom starter. This may not be the case for other Greek starters.
First decide whether you want to go after a thermophilic or mesophilic yogurt starter.
Thermophilic: This is the most common type of yogurt people make in the US. These bacteria like warmer temperatures of about 100 to 114 degrees F. As a result they require a yogurt maker or some means of keeping them at this temperature.
Mesophilic: These yogurts allow for fermentation at room temperature around 70 to 77 degrees F which means they don’t require a yogurt maker.
Second, figure out if you would like an heirloom or non-heirloom yogurt starter.
Heirloom: This simply means you make a batch of yogurt, save a little from that batch, and use it to start the next batch. These are nice because you don’t have to keep buying starter. However, you do have to keep feeding your starter every 1 or 2 weeks to keep it alive.
Non-heirloom: In this case you’ll need to use fresh starter every 2 or 3 batches. These generally produce more consistent taste/texture than heirloom varieties.
Third, your personal preference for taste and texture comes into play. The following table table will help guide you on the taste/texture associated with each yogurt starter.
Texture
Taste
Greek
very thick
mildly tart
Vegan
creamy (requires thickener)
mildly tart
Bulgarian
thick
tart
Yogourmet
creamy
mildy tart
Viili
ropy texture
mild flavor (not tart)
Matsoni
ropy texture
slightly tart
Filmjolk
thin consistency similar to kefir
slightly tart
Piima
very thin and more drinkable than Filmjolk
slightly tart
SCD
creamy
very tart
For folks wondering what ‘ropy’ texture is check out the following video:
The previous taste/texture table gave general characteristics for each starter. Other factors effecting taste are:
Lactic acid: This is a byproduct of fermentation and gives yogurt that tart taste. Longer fermentation means more lactic acid and more tartness.
Straining: Dripping or straining your yogurt removes whey which contains lactic acid. This is why straining will subdue some of the tartness.
Milk fat: An increase in percent milk fat is a well known method to reduce tartness.
Finally, other contributing factors to texture are:
Straining: Of course straining will thicken yogurt by removing whey and leaving behind coagulated milk proteins.
Heating: Pasteurizing milk prior to making yogurt denatures milk proteins and helps then coagulate when cooled. Also, holding milk at a high temperature removes water content via steam and results in a thicker yogurt.
Milk fat: Using milk with a higher fat content (like whole milk) or adding butter milk results in a creamier, thicker yogurt.
Original article and pictures take www.yogurtstartercultures.com site
What to Do With a Bounty of Cherries (Even the Pits!)
I may receive a commission if you purchase something mentioned in this post. More details here.
Last week, we managed to go cherry picking four times! It kind of blows my mind that there are so many fruit trees planted around here that no one seems to pick the fruit from. I don’t know why that is… It is perfectly legal to do so, and few things are as obviously edible and identifiable as a cherry. But I won’t complain about it, since that means we can pick all the cherries ourselves, and find things to do with them. I’ll show you what we’ve been doing with the huge amount of cherries we’ve come home with, and then some other ideas you might try.
The first thing we did was to make Black Cherry Crème Fraîche Ice Cream. That was a huge hit, and I have saved some pitted black cherries in the freezer for another batch.
While I was pitting the cherries for the ice cream, I started thinking that I should definitely find some projects that use the pits. So I am also making cherry pit vinegar and noyeaux liqueur with them. I have even found a recipe for Cherry Pit Ice Cream! There is some real controversy over using the pits in food, since they do contain small amounts of an enzyme that converts to cyanide. Some people are really freaked out about that, and some people don’t think it’s worth worrying about at all. Here are someposts on that, and you can decide for yourself what to do. I have just opted not to crush the pits, and let the flavor seep into other liquids without actually consuming the pits. I am comfortable with that. (But if someone made me some cherry pit ice cream, I would totally eat it.)
On the first day of cherry picking, we collected a nice amount of morello cherries. These are more tart, and are supposed to make a really nice liqueur. So that’s what I’ve done with them. I simply layered cherries and sugar, and then immersed those layers in vodka. We made sloe gin this way last year, and it turned out really nicely. This will take a few months, and I’m totally fine with that. I imagine we’ll be able to use the cherries we pull out of the liqueur for something interesting, too.
(Left to Right: Cherry Vinegar, Noyeaux, Morello Cherry Liqueur)
The cherries we picked the most of near home are quite small, but full of dark, syrupy cherry flavor. Our first haul was made into a Black Cherry Soda, which I made using a similar method similar to the one I posted about making Elderflower Soda— instead of brewing a tea, I bashed the cherries for their juice and fortified it with some sugar, and added water and a little whey. It’s really good! Pulpy, but super carbonated, and the flavor is really intense.
Once we accumulated a large amount of the little black cherries over a few days, I decided to make those into wine, since I had about 5-6 pounds of them. I was not up to the challenge of pitting hundreds of them, so I froze them first. This helps them break down more easily during the fermenting process. I let them thaw, then bashed them severely inside the fermenting tub with a bottle. They are going through their first ferment right now, and then I’ll strain out the cherry matter and put the liquid into some demijohns. I’m basically following the same process I used for making Elderberry Wine. [OK. Let me just stop right here and tell you that, a year later, that elderberry wine is amazing. I can’t believe we managed to produce something so wonderful, and we will definitely be making a bigger batch this year!]
Here are some other ideas for using up a wonderful cherry harvest:
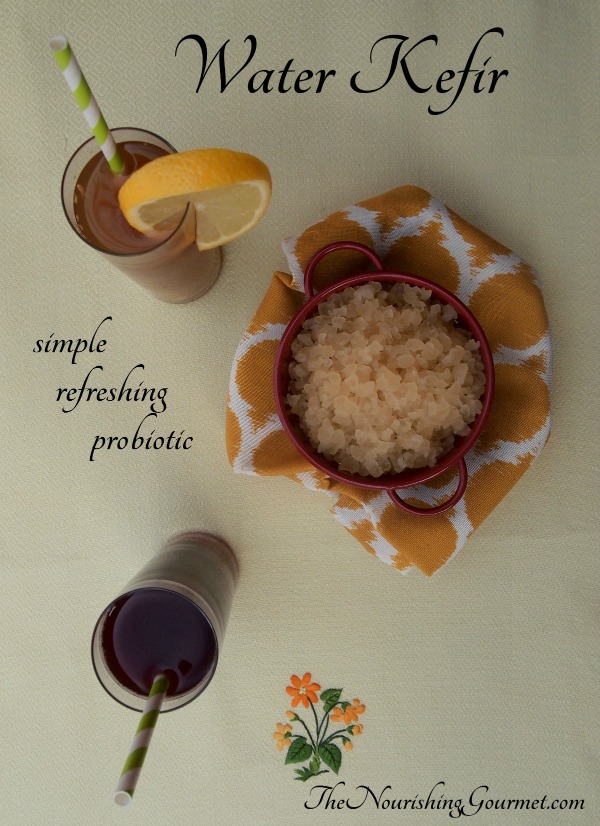
In an attempt to increase the amount of probiotic foods in our diet, I have been making water kefir a lot lately.
Water Kefir is an effervescent, probiotic rich fermented drink that can be used to make a healthy homemade soda. Like most other probiotic rich fermented foods, it supports gut health and systemic wellness.
It is enzyme rich and filled with amino acids, and is also rich in vitamin B12, vitamin K and biotin.
Water kefir is made using a scoby (Symbiotic culture of bacteria and yeasts) called Tibicos, although most people simply refer to them as water kefir grains. Unlike a kombucha scoby, water kefir grains are small, translucent jelly like lumps around 5mm in size although they can grow to be much larger.
You add the grains to a sugar water solution, and the bacteria and yeasts feed on the sugar turning it into a number of beneficial acids and infusing the water with probiotic microorganisims, B vitamins and food enzymes. This process reduces the amount of sugar in the finished drink. It does produce a small amount of alcohol as well, but in most cases, this ranges from 0.5% to 0.75% depending on how you brew it. The longer you brew it, the more alcohol it will contain. This post deals with the alcohol content of water kefir.
I purchased my water kefir grains in a dried form from Cultures for Health, but you may be able to find someone local who will give or sell you some. Try searching on Craigslist or Kijiji. You could also try asking on groups such as Wild Fermentation on Facebook.
It is very easy to make, and because you flavour it yourself with fruit or juice, the variations you can make are endless.
I like to make my water kefir using an unrefined organic cane sugar as this provides the mineral rich environment that the water kefir grains love. I also add a pinch of sea salt (for minerals again). In case you are thinking “But sugar is not paleo”, read this post by The Paleo Mom on using sugar as a sweetener. As long as you do not over consume the water kefir (and really, you do not need to consume more than a single glass in a day) you really won’t be getting huge amounts of sugar, and this beverage contains far less sugar than a can of coke, and none of the harmful artificial flavourings and additives.
Honey does not make a good substitute for the sugar as it has antimicrobial propeties and can weaken or kill your water kefir grains. Likewise, sugar-free sweeteners such as stevia cannot be used to make water kefir as they would not provide any food for the grains.
Water kefir is made in 2 stages – a primary fermentation where the grains grow in the sugar water for 24-48 hours, then a secondary fermentation where fruit, juice or herbs and spices are added to flavour the liquid. It is during the secondary fermentation that the carbonation takes place.
Water Kefir Soda
makes 1 quart
For the primary fermentation:
¼ cup water kefir grains (one packet of dehydrated grains from Cultures for Health will yield ¼ cup when rehydrated)
¼ cup unrefined organic cane sugar
1 pinch of unrefined sea salt
un-chlorinated filtered water (if you are using tap water, boil it to remove the chlorine and allow to cool)
Dissolve the sugar and sea salt in the water, and place in a 1 quart jar. Add the water kefir grains (if using dehydrated ones, follow the instructions that come with them for re-hydrating them).
Cover the mouth of the jar with a coffee filter held in place with an elastic band and place in a room-temperature dark place for 24-48 hours. I put mine in the pantry.
The longer you leave it, the more of the sugar that will be fermented out, but do not leave it for more than 48 hours or it will starve your grains.
After 48 hours, strain the grains through a strainer, reserving the liquid. Some people tell you never to use metal, but I have been, and my grains are fine. I figure the few seconds it takes me to strain out the grains and then dump them into a new container of sugar water won’t harm them or me.
Place your strained grains into a new jar of sugar water to start the process again.
The strained liquid is what you are going to use to make the water kefir.
Place it in a new mason jar with whatever you decide to flavour it with. You could use ½ cup of fruit juice, but I most often add whole fruit to the jar. I also add herbs or spices sometimes.
These are some of my favourites:
1 cup diced pineapple and a sprig of mint mint
a diced grapefruit (this one is WONDERFUL!)
a sliced lemon and a sprig of mint
½ cup of frozen mixed berries
a 1″ piece of ginger sliced (no need to peel), ½ lemon sliced, 2-3 star anise, a cinnamon stick, a tsp cardamom seeds and a tsp vanilla extract
½ cup frozen saskatoon berries and a couple of sprigs of fresh basil
2 peppermint teabags (seriously, it is VERY good!)
Seal the jar with a lid and place it on the kitchen counter for 12-24 hours until the flavours have infused and the drink is starting to get bubbly. As per the article I linked to above, you don’t want to let it get so bubbly that it fountains out of the jar. You want it just about the fizziness of a can of coke.
Now you can strain out any solid flavouring ingredients and store it in the fridge.
I like to transfer it to a flip-top bottle like this one for storage.
Water kefir is a lightly sweet and refreshing tonic, bubbling over with healthy bacteria (You can read about the health benefits of fermented foods here) . The taste is pleasant on its own or it can be elevated with an endless combination of flavors. Spicy lemon ginger and cultured grape soda are pictured here (our current favorites!)
As part of the 21 Steps to a Nourishing Diet Series, water kefir can be a nice segue into home fermentation. This cultured drink is very inexpensive to make, virtually fail-proof and packs a healthy wallop of probiotics. I can’t think of an easier, more instantly rewarding way to start fermenting.
Basic water kefir is made by dropping water kefir “grains” (which are not really grains at all but a symbiotic culture of bacteria and yeast or SCOBY) into sugar water and allowing it to ferment on the counter for a few days. The grains (which look like small, clear jellies) can be used over and over indefinitely, and usually multiply, allowing them to be passed on to others.
Our experience with water kefir
My family started drinking water kefir about a year ago. At the time, I was getting into home fermentation in an effort to get a wider range of probiotics into our diet. Probiotic-rich foods not only create a more favorable balance of gut flora, but amazingly, the bacteria work to physically repair the gut lining.
Several days later, I nervously strained the finished water kefir and reused the grains to make my first new batch. Within hours it started coming to life. I relaxed as the mixture bubbled away happily in a dark and formerly stagnant corner of my kitchen counter. It was fun to check in now and then, giving the mason jar a little twist to encourage bubbles to surface (I read later that this is a good thing to do if you think of it.) Plus, the taste was quite pleasant!
My children and I benefited right away. My 2-yr old daughter had recently snubbed her nourishing diet for a phase of picky eating that was starting to affect her digestion. Her digestion normalized after the first round of water kefir. I was also thrilled to be getting probiotics into my son again, who at the time did not like soured milk products or sauerkraut.
My husband obliged but never really noticed any benefit. If anything, he felt better without it, so he gave it up after a while. Lately though as I’ve been experimenting with new flavors, he’s been giving it another try. I’m wondering if the added complexity of flavored water kefir (the tang of cultured grape or the sour-spicy combo of lemon-ginger) will allow his body to receive it better. Taste does impact digestion.
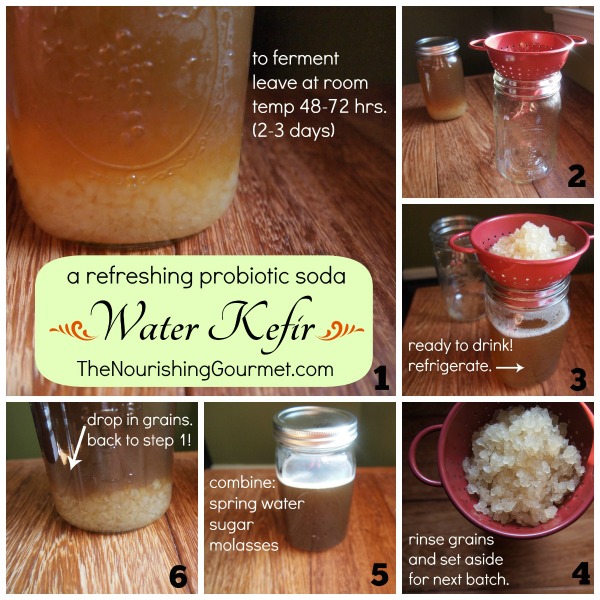
Follow these step-by-step photos to brew your own water kefir
(see recipe for exact measurements and variations)
If you receive grains from a friend, they will likely come mid-ferment as shown in Step 1.
If you purchase dehydrated grains from a place like Cultures for Health, you will receive detailed instructions on how to rehydrate them, which will probably be very similar to the diagram below, but it may take a few rounds for the grains to recalibrate before your water kefir is enjoyable.
Questions and Answers about Water Kefir
What types of sugars can I use? What about coconut palm sugar, honey and maple syrup?
Unrefined cane sugar is recommended with molasses (added and/or still intact) to provide minerals that the grains need. Lately I have been use sucanat (#affiliatelink) and my grains are thriving. However, I started with organic cane sugar (fine granulated) and that also worked well and is more cost effective. *With sucanat, I use a generous 1/4 cup + 1t molasses and ferment for 48 hours. With organic cane sugar I use a level 1/4 cup + 1t molasses and ferment for 72 hours.
It is possible to use coconut palm sugar, honey and maple syrup as well (substituting equally) but over time the grains will weaken as the sugar makeup isn’t optimal. This should only be done when you your grains have multiplied and you have extra to experiment with. I recently experimented with honey and it made a nice drink, though the grains did not multiply as they usually do. Maple syrup may work better because it is typically not as antimicrobial as is honey.
How much should I drink?
As you might imagine, there are no hard and fast rules. We started out drinking an ounce or two after each meal. This was a good way to see how our bodies responded to it. You may want to start with even less if your diet doesn’t include a lot of fermented foods. Now we are a little more erratic, but I’d say we have about 2-6 ounces on most days. We sometimes take breaks by putting it into hibernation. It’s always wise to listen to your body and practice moderation, even with the good stuff.
Can I take a break from making it?
Yes! Grains can be put into hibernation mode or dehydrated. To hibernate, just mix up a new batch (as pictured in “step 6”) and stick it in the fridge instead of leaving it out to ferment. I’ve left mine there for almost a month with no problems but I’d suggest checking on them after 1-2 weeks as all grains are different.
I have yet to dehydrate our grains, but here is how to do it from what I understand. Rinse the grains with filtered water and spread them out between two sheets of parchment and leave in a safe, but ventilated place to dry out at room temperature for 1-4 days. You want them to be very dry. You can also use a dehydrator. They should keep for several months.
What is the alcohol content and is it safe for kids?
The alcohol content is very low – well below 1% which is less than overripe fruit. It climbs a little if using straight juice or when doing a second fermentation (as described in the recipe notes) but it would be a challenge to get even mildly intoxicated by drinking water kefir.
My children might drink it once or twice a day, in small 2-3 ounce glasses (less if it’s a second fermentation). It is an individual judgement call as there are no strong warnings against giving it to children. I did read once, in a book by Maria Montessori, that she did not recommend giving fermented drinks to children. I assume she was referring to alcohol, but it did make me take pause.
How much sugar remains after fermentation?
This is taken from the Q & A section about water kefir grains from Cultures of Health. “The sucrose is converted to glucose+fructose. The glucose is used by the kefir grains for grain-building and reproduction, and the fructose remains in the drink at about 20% of the original level. The longer the finished kefir sits, the less sweet it will be, so some fructose is apparently converted in that process as well.”
Where did kefir grains originate?
Water kefir is truly cosmopolitan. From Italy to the Far East to Mexico, various names and twists exist. It’s origins are unclear, but it is speculated to have originated in Mexico, where, according to research, “tibicos” culture forms on the pads of the Opuntia cactus (read more here). Milk kefir grains, which have a different composition, likely originated in the Caucasus Mountains region.
Do you have any questions or an experience to share? We would love to hear!
Original article and pictures take www.thenourishinggourmet.com site