Bouillon strainers (or Chinois) are simply any cone shaped strainer with very fine metal mesh. They are traditionally used to strain sauces and soups to produce a smooth texture. This fine stainless steel mesh also makes them a great choice for your yogurt strainer. To see more uses for the Chinois check out the Wiki page here.
The Matfer Exoglass Bouillon Strainer
Matfer is a French cookware company that’s been serving the US for over 25 years. Generally speaking, its products are among the higher end cookware. Most offerings are field tested in commercial kitchens before hitting the market. As a result they are very durable, easy to clean, and ergonomic products. The Matfer Exoglass Bouillon Strainer
is no exception receiving high customer ratings on Amazon.
Construction
Their Exoglass composite material (any part of the strainer that’s black) goes around the rim of the cone and extends over the handle. This material is durable, temperature stable up to 430 degrees F, and easy to clean. The cone-shaped wire mesh is constructed of food grade stainless steel. This stainless steel wire mesh is sealed into the Exoglass material around the rim of the strainer.
Note: Other brands use a different method for securing the mesh to the strainer. The mesh is made into a cone shape. A metal loop is placed on the inside of this cone near the rim. A second metal loop is placed on the outside of the cone near the rim. These two loops are then clamped together, securely holding the mesh in place. This allows for bacteria to become trapped between the metal pieces which isn’t ideal for a yogurt strainer.
The Matfer strainer also has two cross wires that follow the contour of the mesh. This helps protect the mesh when setting the strainer on its side or storing it with other cookware.
How to Use as a Yogurt Strainer
Support the strainer so that it’s elevated of above your kitchen counter. This can be done by setting the strainer in a deep cooking pot. The strainer has two hooks that can rest on the rim of the pot. Another option is to buy the Matfer strainer stand which has a wire loop the strainer can sit in. And a third option is to place the strainer in a large water pitcher letting the cross wires rest against the rim of the water pitcher.
After the yogurt has cultured, gently place the yogurt in the strainer using a ladle. Try to put each scoop of yogurt directly on top of the previous scoop rather than letting is slide down the side of the strainer. The less you disturb the yogurt, the faster it will stain. The liquid whey will drain out, leaving the coagulated milk proteins behind. To get your desired thickness, you can either time the straining or measure the volume of whey that’s released.
PS, check out our Greek page if you’re interested in making Greek yogurt!
Original article and pictures take www.yogurtstartercultures.com site
The Yogourmet yogurt starter gets its own page because it is such a popular product. The company has been around since 1983 and even makes its own yogurt maker. It receives high customer ratings for its reliability and consistency in texture and taste. Yogourmet makes a standard yogurt starter and a probiotic yogurt starter.
and it’s their most popular. In addition to the usual L. bulgaricus and S. thermophilus strains, it also contains L. acidophilus. This is a strain frequently used in probiotic pills and known to reduce lactose in yogurt.
To make the standard version your ferment at about 110 degrees F. One thing that makes this version popular is a very short culture time of only 4 – 4 1/2 hours.
contains the same three bacteria strains mentioned above. However, for this product they also add two more strains: L.casei and B.longum. These additional strains are associated with boosting the immune system and regularity of food transit (source: Yogourmet).
Preparation for this starter is a little different than the standard product. The starter is added to milk at 73 – 77 degrees F. Then gradually heated up to about 110 degrees F over the course of 9 to 15 hours.
Yogourmet recommends their yogurt maker for this but other methods such as an oven or heating pad will work as well. Basically place the yogurt in an environment where the top temperature is 110 degrees F.
Taste and Texture
Both Yogourmet starters tend to produce a creamy texture. The taste of the regular may be a little more tart than probiotic variety.
Conslusion
Both products are a great source of probiotic bacteria. If you’re looking for a broader range of beneficial bacteria then you want to go with their probiotic starter. However, the standard version may be more desirable for those following the SCD diet.
You can make 3 or so batches of the standard yogurt in the time it takes to make 1 probiotic batch. However, many people let their yogurt culture overnight and don’t consider this a problem.
Both yogurt starters are very popular and reliable so you can’t go wrong with either one! The following table is a summary of the differences between these two awesome starters:
Standard
Probiotic
taste
mildly tart: little more tart than probiotic version
mildly tart
texture
creamy
creamy
strains
L. Bulgarius, S. Thermophilus, L. Acidophilus
L. Bulgaricus, S. Thermophilus, L. Acidophilus, L. Casei, B. Longum
fermentation time
4 - 4 1/2 hours
9 - 15 hours
fermentation temperature
108 - 110 degrees F
initial: 73 - 77 degrees F final: 108 - 110 degrees F
Original article and pictures take www.yogurtstartercultures.com site
Yogourmet is well known for production of top selling and highly rated yogurt starters. And just like their yogurt products, Yogourmet Kefir Starter is one of the most popular in the kefir category as well. With over three decades of experience, Yogourmet produces a potent kefir starter that gives customers the highest chance of success for each batch.
What is Kefir?
Kefir is a fermented milk beverage that originated in Russia and Central Asian countries. It was brought to the US in the early 1900s and has been growing in popularity ever since (source: Wiki). Kefir starter is a combination of yeast and bacteria used to ferment milk. Traditionally this starter is used with cow, goat, or sheep milk. The combination of yeast and bacteria produce a consistency similar to thin, drinkable yogurt.
to a milk of your choice. Kefir ferments at room temperature between 68 to 77 degrees F. The ideal length of fermentation time for kefir is about 24 hours. Ideally the kefir should ferment in a closed container that’s not exposed to light. The combination of yeast/bacteria found in kefir is very robust. As a result, some kefir can be saved from each batch to start a new batch.
Taste/Texture
The bacteria in kefir ferment the milk sugar called lactose. Two of the byproducts of this fermentation are lactic acid and kefiran. Lactic acid contributes to a mildly sour taste while kefiran imparts a creamy texture. These beneficial bacteria also produce other acid byproducts which give kefir a buttery flavor. Much like yogurt, increasing fermentation time will increase lactic acid and result in more of a tart flavor.
Yeast ferment the lactose as well, but their byproducts are alcohol and carbon dioxide. The alcohol is typically only 0.2 – 2% which make it hard to taste in the final produce. The carbon dioxide can impart natural carbonated texture to this beverage.
Figuring out which starter to use can seem tricky at first but once you decide on some basics it’s fairly easy. The following figure shows the breakdown of yogurt starter classes.
Note: the Greek yogurt starter on this site is indeed an heirloom starter. This may not be the case for other Greek starters.
First decide whether you want to go after a thermophilic or mesophilic yogurt starter.
Thermophilic: This is the most common type of yogurt people make in the US. These bacteria like warmer temperatures of about 100 to 114 degrees F. As a result they require a yogurt maker or some means of keeping them at this temperature.
Mesophilic: These yogurts allow for fermentation at room temperature around 70 to 77 degrees F which means they don’t require a yogurt maker.
Second, figure out if you would like an heirloom or non-heirloom yogurt starter.
Heirloom: This simply means you make a batch of yogurt, save a little from that batch, and use it to start the next batch. These are nice because you don’t have to keep buying starter. However, you do have to keep feeding your starter every 1 or 2 weeks to keep it alive.
Non-heirloom: In this case you’ll need to use fresh starter every 2 or 3 batches. These generally produce more consistent taste/texture than heirloom varieties.
Third, your personal preference for taste and texture comes into play. The following table table will help guide you on the taste/texture associated with each yogurt starter.
Texture
Taste
Greek
very thick
mildly tart
Vegan
creamy (requires thickener)
mildly tart
Bulgarian
thick
tart
Yogourmet
creamy
mildy tart
Viili
ropy texture
mild flavor (not tart)
Matsoni
ropy texture
slightly tart
Filmjolk
thin consistency similar to kefir
slightly tart
Piima
very thin and more drinkable than Filmjolk
slightly tart
SCD
creamy
very tart
For folks wondering what ‘ropy’ texture is check out the following video:
The previous taste/texture table gave general characteristics for each starter. Other factors effecting taste are:
Lactic acid: This is a byproduct of fermentation and gives yogurt that tart taste. Longer fermentation means more lactic acid and more tartness.
Straining: Dripping or straining your yogurt removes whey which contains lactic acid. This is why straining will subdue some of the tartness.
Milk fat: An increase in percent milk fat is a well known method to reduce tartness.
Finally, other contributing factors to texture are:
Straining: Of course straining will thicken yogurt by removing whey and leaving behind coagulated milk proteins.
Heating: Pasteurizing milk prior to making yogurt denatures milk proteins and helps then coagulate when cooled. Also, holding milk at a high temperature removes water content via steam and results in a thicker yogurt.
Milk fat: Using milk with a higher fat content (like whole milk) or adding butter milk results in a creamier, thicker yogurt.
Original article and pictures take www.yogurtstartercultures.com site
What to Do With a Bounty of Cherries (Even the Pits!)
I may receive a commission if you purchase something mentioned in this post. More details here.
Last week, we managed to go cherry picking four times! It kind of blows my mind that there are so many fruit trees planted around here that no one seems to pick the fruit from. I don’t know why that is… It is perfectly legal to do so, and few things are as obviously edible and identifiable as a cherry. But I won’t complain about it, since that means we can pick all the cherries ourselves, and find things to do with them. I’ll show you what we’ve been doing with the huge amount of cherries we’ve come home with, and then some other ideas you might try.
The first thing we did was to make Black Cherry Crème Fraîche Ice Cream. That was a huge hit, and I have saved some pitted black cherries in the freezer for another batch.
While I was pitting the cherries for the ice cream, I started thinking that I should definitely find some projects that use the pits. So I am also making cherry pit vinegar and noyeaux liqueur with them. I have even found a recipe for Cherry Pit Ice Cream! There is some real controversy over using the pits in food, since they do contain small amounts of an enzyme that converts to cyanide. Some people are really freaked out about that, and some people don’t think it’s worth worrying about at all. Here are someposts on that, and you can decide for yourself what to do. I have just opted not to crush the pits, and let the flavor seep into other liquids without actually consuming the pits. I am comfortable with that. (But if someone made me some cherry pit ice cream, I would totally eat it.)
On the first day of cherry picking, we collected a nice amount of morello cherries. These are more tart, and are supposed to make a really nice liqueur. So that’s what I’ve done with them. I simply layered cherries and sugar, and then immersed those layers in vodka. We made sloe gin this way last year, and it turned out really nicely. This will take a few months, and I’m totally fine with that. I imagine we’ll be able to use the cherries we pull out of the liqueur for something interesting, too.
(Left to Right: Cherry Vinegar, Noyeaux, Morello Cherry Liqueur)
The cherries we picked the most of near home are quite small, but full of dark, syrupy cherry flavor. Our first haul was made into a Black Cherry Soda, which I made using a similar method similar to the one I posted about making Elderflower Soda— instead of brewing a tea, I bashed the cherries for their juice and fortified it with some sugar, and added water and a little whey. It’s really good! Pulpy, but super carbonated, and the flavor is really intense.
Once we accumulated a large amount of the little black cherries over a few days, I decided to make those into wine, since I had about 5-6 pounds of them. I was not up to the challenge of pitting hundreds of them, so I froze them first. This helps them break down more easily during the fermenting process. I let them thaw, then bashed them severely inside the fermenting tub with a bottle. They are going through their first ferment right now, and then I’ll strain out the cherry matter and put the liquid into some demijohns. I’m basically following the same process I used for making Elderberry Wine. [OK. Let me just stop right here and tell you that, a year later, that elderberry wine is amazing. I can’t believe we managed to produce something so wonderful, and we will definitely be making a bigger batch this year!]
Here are some other ideas for using up a wonderful cherry harvest:
In an attempt to increase the amount of probiotic foods in our diet, I have been making water kefir a lot lately.
Water Kefir is an effervescent, probiotic rich fermented drink that can be used to make a healthy homemade soda. Like most other probiotic rich fermented foods, it supports gut health and systemic wellness.
It is enzyme rich and filled with amino acids, and is also rich in vitamin B12, vitamin K and biotin.
Water kefir is made using a scoby (Symbiotic culture of bacteria and yeasts) called Tibicos, although most people simply refer to them as water kefir grains. Unlike a kombucha scoby, water kefir grains are small, translucent jelly like lumps around 5mm in size although they can grow to be much larger.
You add the grains to a sugar water solution, and the bacteria and yeasts feed on the sugar turning it into a number of beneficial acids and infusing the water with probiotic microorganisims, B vitamins and food enzymes. This process reduces the amount of sugar in the finished drink. It does produce a small amount of alcohol as well, but in most cases, this ranges from 0.5% to 0.75% depending on how you brew it. The longer you brew it, the more alcohol it will contain. This post deals with the alcohol content of water kefir.
I purchased my water kefir grains in a dried form from Cultures for Health, but you may be able to find someone local who will give or sell you some. Try searching on Craigslist or Kijiji. You could also try asking on groups such as Wild Fermentation on Facebook.
It is very easy to make, and because you flavour it yourself with fruit or juice, the variations you can make are endless.
I like to make my water kefir using an unrefined organic cane sugar as this provides the mineral rich environment that the water kefir grains love. I also add a pinch of sea salt (for minerals again). In case you are thinking “But sugar is not paleo”, read this post by The Paleo Mom on using sugar as a sweetener. As long as you do not over consume the water kefir (and really, you do not need to consume more than a single glass in a day) you really won’t be getting huge amounts of sugar, and this beverage contains far less sugar than a can of coke, and none of the harmful artificial flavourings and additives.
Honey does not make a good substitute for the sugar as it has antimicrobial propeties and can weaken or kill your water kefir grains. Likewise, sugar-free sweeteners such as stevia cannot be used to make water kefir as they would not provide any food for the grains.
Water kefir is made in 2 stages – a primary fermentation where the grains grow in the sugar water for 24-48 hours, then a secondary fermentation where fruit, juice or herbs and spices are added to flavour the liquid. It is during the secondary fermentation that the carbonation takes place.
Water Kefir Soda
makes 1 quart
For the primary fermentation:
¼ cup water kefir grains (one packet of dehydrated grains from Cultures for Health will yield ¼ cup when rehydrated)
¼ cup unrefined organic cane sugar
1 pinch of unrefined sea salt
un-chlorinated filtered water (if you are using tap water, boil it to remove the chlorine and allow to cool)
Dissolve the sugar and sea salt in the water, and place in a 1 quart jar. Add the water kefir grains (if using dehydrated ones, follow the instructions that come with them for re-hydrating them).
Cover the mouth of the jar with a coffee filter held in place with an elastic band and place in a room-temperature dark place for 24-48 hours. I put mine in the pantry.
The longer you leave it, the more of the sugar that will be fermented out, but do not leave it for more than 48 hours or it will starve your grains.
After 48 hours, strain the grains through a strainer, reserving the liquid. Some people tell you never to use metal, but I have been, and my grains are fine. I figure the few seconds it takes me to strain out the grains and then dump them into a new container of sugar water won’t harm them or me.
Place your strained grains into a new jar of sugar water to start the process again.
The strained liquid is what you are going to use to make the water kefir.
Place it in a new mason jar with whatever you decide to flavour it with. You could use ½ cup of fruit juice, but I most often add whole fruit to the jar. I also add herbs or spices sometimes.
These are some of my favourites:
1 cup diced pineapple and a sprig of mint mint
a diced grapefruit (this one is WONDERFUL!)
a sliced lemon and a sprig of mint
½ cup of frozen mixed berries
a 1″ piece of ginger sliced (no need to peel), ½ lemon sliced, 2-3 star anise, a cinnamon stick, a tsp cardamom seeds and a tsp vanilla extract
½ cup frozen saskatoon berries and a couple of sprigs of fresh basil
2 peppermint teabags (seriously, it is VERY good!)
Seal the jar with a lid and place it on the kitchen counter for 12-24 hours until the flavours have infused and the drink is starting to get bubbly. As per the article I linked to above, you don’t want to let it get so bubbly that it fountains out of the jar. You want it just about the fizziness of a can of coke.
Now you can strain out any solid flavouring ingredients and store it in the fridge.
I like to transfer it to a flip-top bottle like this one for storage.
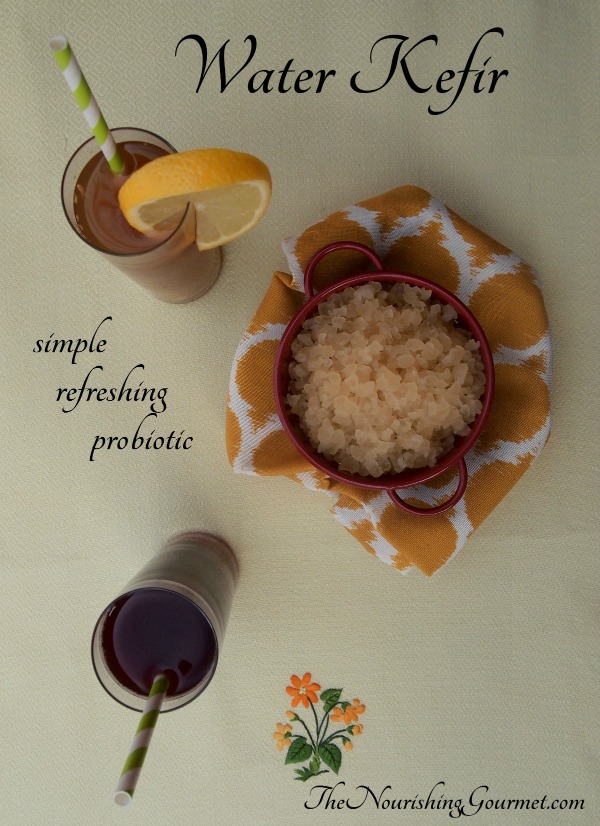
Water kefir is a lightly sweet and refreshing tonic, bubbling over with healthy bacteria (You can read about the health benefits of fermented foods here) . The taste is pleasant on its own or it can be elevated with an endless combination of flavors. Spicy lemon ginger and cultured grape soda are pictured here (our current favorites!)
As part of the 21 Steps to a Nourishing Diet Series, water kefir can be a nice segue into home fermentation. This cultured drink is very inexpensive to make, virtually fail-proof and packs a healthy wallop of probiotics. I can’t think of an easier, more instantly rewarding way to start fermenting.
Basic water kefir is made by dropping water kefir “grains” (which are not really grains at all but a symbiotic culture of bacteria and yeast or SCOBY) into sugar water and allowing it to ferment on the counter for a few days. The grains (which look like small, clear jellies) can be used over and over indefinitely, and usually multiply, allowing them to be passed on to others.
Our experience with water kefir
My family started drinking water kefir about a year ago. At the time, I was getting into home fermentation in an effort to get a wider range of probiotics into our diet. Probiotic-rich foods not only create a more favorable balance of gut flora, but amazingly, the bacteria work to physically repair the gut lining.
Several days later, I nervously strained the finished water kefir and reused the grains to make my first new batch. Within hours it started coming to life. I relaxed as the mixture bubbled away happily in a dark and formerly stagnant corner of my kitchen counter. It was fun to check in now and then, giving the mason jar a little twist to encourage bubbles to surface (I read later that this is a good thing to do if you think of it.) Plus, the taste was quite pleasant!
My children and I benefited right away. My 2-yr old daughter had recently snubbed her nourishing diet for a phase of picky eating that was starting to affect her digestion. Her digestion normalized after the first round of water kefir. I was also thrilled to be getting probiotics into my son again, who at the time did not like soured milk products or sauerkraut.
My husband obliged but never really noticed any benefit. If anything, he felt better without it, so he gave it up after a while. Lately though as I’ve been experimenting with new flavors, he’s been giving it another try. I’m wondering if the added complexity of flavored water kefir (the tang of cultured grape or the sour-spicy combo of lemon-ginger) will allow his body to receive it better. Taste does impact digestion.
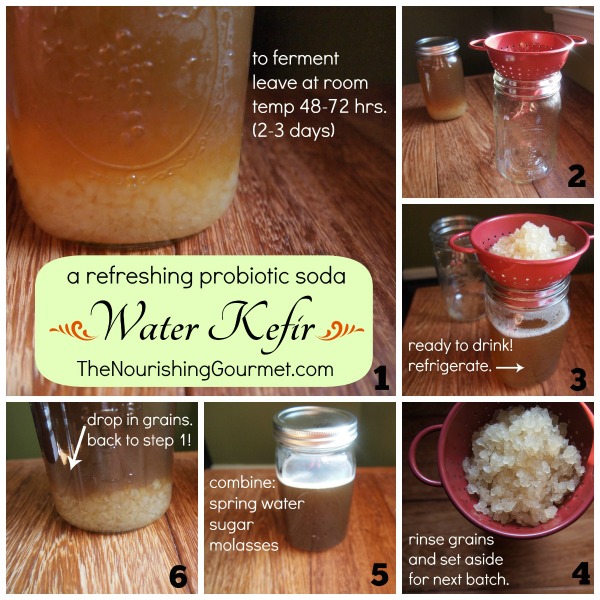
Follow these step-by-step photos to brew your own water kefir
(see recipe for exact measurements and variations)
If you receive grains from a friend, they will likely come mid-ferment as shown in Step 1.
If you purchase dehydrated grains from a place like Cultures for Health, you will receive detailed instructions on how to rehydrate them, which will probably be very similar to the diagram below, but it may take a few rounds for the grains to recalibrate before your water kefir is enjoyable.
Questions and Answers about Water Kefir
What types of sugars can I use? What about coconut palm sugar, honey and maple syrup?
Unrefined cane sugar is recommended with molasses (added and/or still intact) to provide minerals that the grains need. Lately I have been use sucanat (#affiliatelink) and my grains are thriving. However, I started with organic cane sugar (fine granulated) and that also worked well and is more cost effective. *With sucanat, I use a generous 1/4 cup + 1t molasses and ferment for 48 hours. With organic cane sugar I use a level 1/4 cup + 1t molasses and ferment for 72 hours.
It is possible to use coconut palm sugar, honey and maple syrup as well (substituting equally) but over time the grains will weaken as the sugar makeup isn’t optimal. This should only be done when you your grains have multiplied and you have extra to experiment with. I recently experimented with honey and it made a nice drink, though the grains did not multiply as they usually do. Maple syrup may work better because it is typically not as antimicrobial as is honey.
How much should I drink?
As you might imagine, there are no hard and fast rules. We started out drinking an ounce or two after each meal. This was a good way to see how our bodies responded to it. You may want to start with even less if your diet doesn’t include a lot of fermented foods. Now we are a little more erratic, but I’d say we have about 2-6 ounces on most days. We sometimes take breaks by putting it into hibernation. It’s always wise to listen to your body and practice moderation, even with the good stuff.
Can I take a break from making it?
Yes! Grains can be put into hibernation mode or dehydrated. To hibernate, just mix up a new batch (as pictured in “step 6”) and stick it in the fridge instead of leaving it out to ferment. I’ve left mine there for almost a month with no problems but I’d suggest checking on them after 1-2 weeks as all grains are different.
I have yet to dehydrate our grains, but here is how to do it from what I understand. Rinse the grains with filtered water and spread them out between two sheets of parchment and leave in a safe, but ventilated place to dry out at room temperature for 1-4 days. You want them to be very dry. You can also use a dehydrator. They should keep for several months.
What is the alcohol content and is it safe for kids?
The alcohol content is very low – well below 1% which is less than overripe fruit. It climbs a little if using straight juice or when doing a second fermentation (as described in the recipe notes) but it would be a challenge to get even mildly intoxicated by drinking water kefir.
My children might drink it once or twice a day, in small 2-3 ounce glasses (less if it’s a second fermentation). It is an individual judgement call as there are no strong warnings against giving it to children. I did read once, in a book by Maria Montessori, that she did not recommend giving fermented drinks to children. I assume she was referring to alcohol, but it did make me take pause.
How much sugar remains after fermentation?
This is taken from the Q & A section about water kefir grains from Cultures of Health. “The sucrose is converted to glucose+fructose. The glucose is used by the kefir grains for grain-building and reproduction, and the fructose remains in the drink at about 20% of the original level. The longer the finished kefir sits, the less sweet it will be, so some fructose is apparently converted in that process as well.”
Where did kefir grains originate?
Water kefir is truly cosmopolitan. From Italy to the Far East to Mexico, various names and twists exist. It’s origins are unclear, but it is speculated to have originated in Mexico, where, according to research, “tibicos” culture forms on the pads of the Opuntia cactus (read more here). Milk kefir grains, which have a different composition, likely originated in the Caucasus Mountains region.
Do you have any questions or an experience to share? We would love to hear!
Original article and pictures take www.thenourishinggourmet.com site
Well I had a huge batch of hot peppers, mostly cayenne and most jalapenos. I normally just like to ferment them in slices but I came across a tutorial for fermented hot sauce from our friend Jenny at Nourished Kitchen.
Peppers are a great food to add to your diet and hot peppers have even more benefits! Hot peppers get their heat—”as well as extraordinary anti-inflammatory, analgesic, anti-cancer, heart-healthy effects—from very high levels of capsaicinoids, the most common form of which is capsaicin.” – source
Does the topic of fermenting baffle you? We created a Fermenting eCourse just for you and when you sign up, we will send you a Quick Start Guide! Grab the eCourse and the guide here!
It was so easy and boy did it make amazing hot sauce! I want to try it next with even hotter peppers (dare I add some ghost peppers???).
Top Reasons Coconut Water Kefir is the Most Healing and Beneficial Probiotic Beverage
Do you remember the first time you heard about kefir or kombucha? It was probably no longer than 5 years ago. Here in America, we didn’t really pay attention to fermented drinks until the whole kombucha craze brought in an awareness of probiotic drinks. Personally, I’ve known of kombucha all my life. It almost comes with mother’s milk in Russia. But as much as I was familiar with the drink, I wasn’t aware of its amazing healing properties. So needless to say the idea of drinking fermented drinks was anything but new to me, however, the idea of making coconut water kefir was an absolute novelty to me. I guarantee not a lot of people are familiar with it either. Some experts even claim it to be more healing and beneficial than kombucha itself. Let’s take a closer look at coconut water kefir.
What is coconut water kefir?
Coconut water kefir is basically fermented coconut water. It is an unbelievably rich probiotic drink that also contains really high amounts of vitamins, minerals, and electrolytes. The vitamin and mineral content of coconut water includes beta carotene, Riboflavin, Thiamin, Niacin, pantothenic acid, folates and vitamins A,B6, C, E and K. What’s more important and why it’s considered better than regular kefir is the fact it doesn’t contain the problematic substances that regular dairy has such as casein and lactose. This just means that your body will process these probiotic benefits better. Coconut water kefir is believed to be the most beneficial probiotic beverage because it has a much more potent effect on the digestive system than any dairy probiotic food such as yogurt. (Read why you should add probiotic foods to your diet)
As we know, dairy is acid forming and not a lot of people can handle it. Additionally, the main minerals or electrolytes in coconut water are the same as those found in human blood.
Health Benefits of coconut water kefir
Stops sugar cravings
Strengthens the immune system
Aids in digestion
Enhances hydration
Increases energy
Clears the skin
More efficient metabolism
Destroys pathogenic yeasts in the body
Improves vision
Great source of dietary minerals such as natural sodium, chloride, and potassium
Has a cleansing effect on the endocrine system
Eases PMS
I found that the best way to consume coconut water kefir (where to find) is by adding it to my smoothies in the morning. I am not a fan of its taste alone so I try to mask it with something else. You can also add it to other health drinks such as freshly squeezed orange juice. I recommend drinking it every day, first thing in the morning. It will significantly increase your energy!
Not intended for the treatment or prevention of disease, nor as a substitute for medical treatment, nor as an alternative to medical advice. Use of recommendations is at the choice and risk of the reader. PAID ENDORSEMENT DISCLOSURE: In order for me to support my blogging activities, I may receive monetary compensation or other types of remuneration for my endorsement, recommendation, testimonial and/or link to any products or services from this blog.
Original article and pictures take www.pinterest.com site
By now, you've probably met some people who say they drink kombucha for it's many health benefits. They may have even convinced you to try it yourself.
But you are probably still left with some questions. What health benefits are they talking about?
It's been called the “wonder drink” and even the “elixir of health” in some parts of the world. You are probably thinking to yourself, surely it's not as magical as people make it out to be.
You are right.
Kombucha is not a cure-all as people have claimed it to be, but that doesn't mean that it can't restore parts of your health.
So, let's take a look at some of the possible health benefits of drinking kombucha tea…
Kombucha Health Benefit #1: Restores Gut and Digestive Health
My husband's kombucha healing story starts here. Just a couple of years ago, he was to the point that he was suffering from heartburn, gas, bloating, and indigestion daily.
We discovered that through drinking kombucha regularly, his digestive issues were vanishing. Today, he is a very different person, with ZERO gastro intestinal complaints.
Kombucha is beneficial for digestive health because is contains probiotics. It is fermented with the aid of a SCOBY (Symbiotic Culture of Bacteria and Yeast). When you drink kombucha, you are actually drinking living beneficial bacteria that help body digest food, absorb more nutrients, and fight the overgrowth of harmful bacteria in the body, including yeast.
Because of this, kombucha is also beneficial for battling candida and yeast overgrowth.
Kombucha is a powerful way to detox the body. So powerful in fact that those who are new to drinking kombucha should take it slow. Start with 1-2 tablespoons a day until you know your body can handle it.
By drinking kombucha regularly to rid your body of toxins, you are making the job easier on your pancreas and liver. I'm sure your pancreas and liver will thank you later in life.
Kombucha is also high in Glucaric acid, which has been shown to be beneficial in cancer prevention in recent studies.
It is normal to experience some digestive upset when you first begin drinking kombucha, especially if you are knew to detoxifying foods and strong probiotics. This is the detox process at work. Again, take it slow and listen to your body as to when you should drink more or less.
Kombucha Health Benefit #3: Boosts Your Immune System
Kombucha contains vitamins and enzymes that our bodies need to maintain a healthy immune system. It is especially high in vitamin B12, with one glass containing as much as 20% of the recommended daily amount for an adult.
Vitamin B12 is found in animal foods and naturally fermented foods, and is a requirement for the healthy functioning of several processes in our bodies.
Benefits of Vitamin B12:
Needed to convert carbohydrates into glucose.
Helps to regulate the nervous system.
Helps to improve cholesterol levels, high blood pressure, and protects against stroke.
Essential for healthy skin, hair, and nails.
Helps protect against certain cancers.
Kombucha Health Benefit #4: Natural Energy Drink
Kombucha has long been known as a “natural energy drink” for several reasons. For one, the B vitamins it contains give the body a good boost of energy.
The second reason that kombucha can provide immediate energy is it's detoxifying effect on the body. By eliminating the body of excess toxins, you will feel better, and therefore have more energy.
Get rid of the coffee and energy drinks. Drink kombucha, which can make you healthier AND make you feel energized.
Kombucha Health Benefit #5: Natural Anti-inflammatory
Kombucha is a rich source of glucosamines, which have been found to be beneficial in reducing the pain and inflammation of arthritis and can even be beneficial in reducing migraine headaches.
Glucosamines also increase the production of synovial hyaluronic acid, which can preserve cartilage and act similarly to NSAIDs in reducing pain and inflammation in the body.
Learn How to Make Your Own Kombucha Tea
Did you know that you can learn how to make your own kombucha?
Kombucha tea in the store cost anywhere from $3-$5 a bottle. A bit pricey if you ask me. But, you can learn to make your own kombucha at home for about 10 to 15 cents per gallon.
(Note: This post may contain affiliate links. Your cost won't change if you purchase something, but I will receive a small commission to help support this site.)
Are you interested in learning how to make kefir at home?
Well, you’re in the right place. I’ve been making homemade milk kefir nearly every day for the past few years, so I consider myself a bit of a kefir expert at this point. Making your own kefir may seem intimidating, but trust me: it’s SO easy.
What IS Milk Kefir? And What are Kefir Grains?
If you’ve landed on this page you probably already know what milk kefir is, but in case you don’t, let me give you a brief intro.
Kefir is a fermented dairy product. It’s similar to yogurt, although kefir has a thinner consistency and is usually drunk rather than eaten out of a bowl. (For more details on the differences between kefir and yogurt, check out my post on kefir vs. yogurt.)
Kefir is produced using kefir grains, symbiotic colonies of yeast and bacteria that feed on lactose, the sugar in milk. Kefir grains look somewhat like little cauliflower florets.
When you add kefir grains to milk, they consume the lactose in the milk, producing a fermented beverage that’s teeming with beneficial bacteria and yeast.
Why Would You Want to Make Your Own Kefir?
While you can buy kefir in the grocery store, making your own kefir gives you complete control over the ingredients you use. I personally prefer to use whole raw milk for my kefir, which I’ve yet to see as an option in a store.
Making your own kefir will also save you a ton of money over buying kefir at the store.
If you are lactose intolerant, making kefir at home also allows you to make a kefir that is virtually lactose-free. This cannot be said of all storebought kefirs, which are often cultured for a shorter amount of time. I am lactose intolerant and have zero problem consuming my own homemade kefir.
Where to Buy Kefir Grains
If you haven’t made kefir before you’ll first need to acquire some milk kefir grains. Depending on where you live, you may be able to get free kefir grains from local kefir-makers. Healthy kefir grains tend to multiply rapidly, so people who regularly make milk kefir are usually happy to share their extra grains with others.
I’ve gotten kefir grains from local real food groups, such as my local Weston A. Price Foundation chapter, and local real food Facebook groups. If you’re not currently a member of any such group, you can look into joining your local Weston Price chapter, or searching Facebook for a nearby real food group. (If you’re in the California Bay Area, I recommend the Real Food Forum!)
If you can’t find any free grains locally you can order milk kefir grains online. I recommend these milk kefir grains. I’ve purchased them a couple of times and have always had great success with them.
If you take good care of your kefir grains they will survive forever, so acquiring/purchasing grains is a one-time, upfront investment.
Is Kefir an Anaerobic Ferment?
For several years I made kefir in a glass jar covered with a breathable cloth and rubber band. A few years ago I switched to making my kefir in anaerobic Fido jars with a Pickl-it lid, because of things I’d read about kefir being an anaerobic process that does best in an airtight environment.
These claims stirred up a ton of controversy and I’m honestly not sure whether anaerobic fermentation is strictly necessary or not. I continue to make kefir in my Pickl-it jars because I already own them and I’m sure that they’re at least not doing me any harm.
If you’re new to making kefir, I’d recommend starting out with regular canning jars; if you decide you want to make kefir a staple of your diet, you can do some research and decide whether you want to upgrade to using Fido jars with Pickl-it lids.
If you do choose to use a Fido jar with a Pickl-it lid, just substitute that equipment for the canning jar and cloth mentioned in the following instructions.
Small piece of cloth and rubber band (to cover your jar) OR a Pickl-it lid
Small silicone spatula, or some other utensil for stirring
How to make kefir
How to make kefir
How to Eat Homemade Milk Kefir
There are a ton of different ways to drink your homemade kefir. When I’m feeling fancy, I’ll use it as a base for a fruit smoothie. More commonly, I just add some raw honey or stevia and splash of this orange extract.
I know those ideas are pretty boring, so if you want more inspiration, check out this post on yummy ways to eat kefir from Traditional Cooking School, as well as this post on unusual kefir uses from Homemade Mommy.
How Much Kefir Should You Make Per Day?
Kefir grains thrive best when they are allowed to spend most of their time culturing on the counter.
As a result, you should ideally make kefir every day, and each batch should be only as big as the amount of kefir that you want to drink in a day’s time. You don’t have to drink all of the finished kefir that day (or even the next day–kefir keeps for a long time in the fridge) but homemade kefir isn’t something that you should make a lot of in order to stock up for the future.
If you only want to drink a small amount of kefir every day, I recommend making a small batch every day rather than making a large batch and then storing the grains in the fridge.
What to Do with Extra Kefir Grains
Kefir grains often multiply quickly. If you find yourself with extra grains, give them away to friends, eat them as extra probiotics, or just throw them away in your trash or compost.
Need to Take a Break from Making Kefir?
If you need to take a break from making kefir, put your kefir grains into a jar with fresh milk as usual then store in the fridge. I’ve read that you should ideally store kefir grains for no longer than a week before providing them with fresh milk, but when we’ve been out of town for longer than a week I’ve successfully kept my kefir grains alive by providing them with a lot of milk. Don’t make a habit of this if you can avoid it, though.
Storing your grains in the fridge for too long will weaken you grains and may eventually kill them.
Can you Make Dairy-free Kefir?
Yes, you can make dairy-free milk kefir. This post from Wellness Mama has some good info on making coconut milk kefir, as well as using other dairy-free milks like almond milk and cashew milk.
Since kefir grains are designed to feed off milk sugar, though, dairy-free milks don’t have the right food source to sustain kefir grains long-term, so you will have to regularly revive the grains by returning them to regular dairy milk. As a result, dairy-free milk kefir may not be the best option if you need to strictly adhere to a dairy-free diet.
Keep in mind that homemade milk kefir is already virtually lactose-free, so if you only have an issue with lactose, not dairy in general, homemade milk kefir is probably already fine for you to consume.
If you need to be strictly dairy-free, I’d recommend that you instead look into making water kefir. Water kefir uses different grains from milk kefir, but it’s still an easy process to do in your home.
Water Kefir Grains
Looking for More Fermented Food Recipes?
If you’re looking for more fermented foods to add to your diet, be sure to check out my posts on how to make kombucha, how to make water kefir, and how to make Instant Pot yogurt. All of these fermented foods will help you get even more beneficial probiotics in your diet.
If you’re on Pinterest, you should also go check out my fermented foods board. I share lots of fermented food recipes from around the web.
STANDARD FTC DISCLOSURE: In order for me to support my blogging activities, I may receive monetary compensation or other types of remuneration for my endorsement, recommendation, testimonial and/or link to any products or services from this blog. Please note, I only ever endorse products that are in alignment with Whole Natural Life’s ideals and I believe would be of value to my readers. Please also note that Whole Natural Life is a participant in the Amazon Services LLC Associates Program, an affiliate advertising program designed to provide a means for sites to earn advertising fees by advertising and linking to amazon.com.
Original article and pictures take wholenaturallife.com site
The Truth About Fermented Food and How To Get Started
DISCLOSURE: Please note these statements have not been evaluated by the Food and Drug Administration. This is for informational purposes only and is not intended to diagnose, treat, cure or prevent disease. I am not a doctor. I am simply sharing my experiences.
Fermented food is all the rage right now. Well, it’s been all the rage throughout history with records of fermentation as early as 3000 BC. Cleopatra did it, Captain James Cook did it, Queen Elizabeth I did it. And now I do it. Popular fermented foods today include kombucha, kefir, sauerkraut, fermented garlic, fermented pickles….you get the idea. I get questions daily about how to get started, where to buy starter culture kits,, & general how to inquiries. Everyone wants to know how to get their fermented probiotics on!
Fermenting food is one the 6 most important steps towards a natural and healthy lifestyle. Here’s why:
Fermented foods are full of natural probiotics. There are good bacteria and bad bacteria in our bodies. The good bacteria are what keep us healthy and keep our digestive system working properly. Probiotics are the good bacteria. Read more about probiotics here.
Fermented foods improve digestion. As we age, we produce less enzymes necessary to break down and digest food. Fermented foods are full of those enzymes.
Fermented foods are very nutrient dense. The fermentation preserves the vitamins & enzymes of the raw foods and new vitamins & enzymes are created during the process.
Culture Your Life has over 45 recipes and Louise walks you through the whole process, including how to choose quality ingredients (yep, even scoby & kefir grains!), what’s a second fermentation & how to do it, and gives you the confidence to get started. She covers everything from baked goods to ice cream to face masks to hand sanitizer. Until I read this book, I had no idea how versatile fermented food really is. I mean, really, really, really is.
Did you know you can make laundry detergent out of kombucha?
Did you know kefir relieves sunburns when used topically?
Did you know that you can use kefir as a face mask for super soft skin?
Did you know you can eat dehydrated kombucha scoby as a probiotic snack?
Are you fed up with IBS symptoms, food sensitivies, lack of energy, hormonal imbalance, & blood sugar problems? Culture Your Life can help! Learn why I am now cultured & will never go back! Order now for only $19!
The Crunchy Moose Original article and pictures take cdn.thecrunchymoose.com site
Traditional cultures didn’t have canning jars or supermarkets. The food they harvested in one season often had to be kept for the upcoming seasons, and their survival often depended on its preservation. Thankfully, they had a simple and effective method of preservation – lacto-fermentation. (By the way, lacto-fermentation doesn’t refer to the use of any milk products, but rather to the lactic acid fermentation responsible for culturing.)
Through fermentation, foods are preserved through the work of healthy bacteria. In a process that seems almost magical, but is easily explained through science, yet with roots going back far into history, not only does fermentation preserve food, but it also transforms food into a probiotic supplement and increases digestibility and vitamin content! It’s no wonder that we find fermented foods all over the world in traditional cultures!
There were so many life-changing things I learned from Nourishing Traditions, by Sally Fallon Morrell, and high on the list was learning the value of fermented foods As part of our 21 steps to a nourishing diet series, I wanted to give an introduction to the topic, and give a couple resource suggestions. Look for new, upcoming fermented recipes as well!
Fermented foods are an excellent source of probiotics
While most of our ancestors’ diets would have been brimming with live probiotic bacteria, ours are often devoid. With more and more research showing the importance of a healthy gut, the importance of eating foods that will aid our gut health is becoming more prominent. I personally think that lacto-fermented foods are high on the list of gut-healing foods.
Studies showing health benefits of probiotics
In fact, there are now studies linking specific probiotics to a wide variety of health benefits.
For example, Bifidobacteria has been linked to decreased cases of neonatal necrotizing enterocolitis.
Many strains of probiotics have been directly linked to reduced bouts of digestive complaints (including diarrhea).
Lactobacillus plantarum has been linked to reduced inflammatory bowel, small bowel bacterial overgrowth in children, reduced problems for sufferers of irritable bowel syndrome, and had a positive effect on the immune systems of those suffering from HIV.
Lactobacillus acidophilus in animal studies has shown a preventative effect for polyps, adenomas, and colon cancer. Source
And those are just a few of the many studies showing benefits!
I personally take probiotics, but I don’t like depending on them solely, as it is believed by some that probiotics in the form of fermented foods are better used by our bodies and are a more effective means to “take probiotics”, if you will. Some studies have zeroed in on specific fermented foods. Sauerkraut, for example, has been shown specifically to be cancer fighting, a digestive aid, and, in one animal study, even a flu fighter! Source
Fermented foods have increased nutritional value
One of the reasons fermented foods are so great is because the fermentation process increases certain nutrients. For example, sauerkraut has an increased vitamin C content. Other traditional fermented food products show a big jump in vitamin content. One example is traditional fermented plant sap ferment by the name of Pulque. During the fermentation process, the thiamine increases from 5 to 29 and the niacin content creases from 54 to 515! All to say, there is a lot of evidence that the fermentation process actually enriches foods with higher amounts of nutrients. Source
Fermented foods are more digestible
I at first assumed that fermented foods were more digestible because of the probiotic content, but that is only part of the benefit! The fermentation process actually makes the food more digestible to us by breaking down hard to digest cellulose in food. This plays an important role in impoverished countries where young infants are fed fermented cereal gruels as a first food. Without the fermentation process, their bodies would have a hard time getting adequate energy from the food. Because so many of us have digestive issues, fermenting our foods could give our bodies a head start in the digestion of our food, while feeding our healthy gut bacteria at the same time.
Fermented foods are safer than raw vegetables to eat
I think that most of us, when first starting to experiment with home ferments, wondered if we were going to do something terribly wrong and kill off our family with the results of our experiments. We just are no longer used to the idea of fermenting things in our home.
But I found it very reassuring that eating fermented foods is safer than eating raw vegetables. The reason is that while yes, raw vegetables can have E.coli on it, once the fermentation process starts, the lactic acid and the E. coli are in direct competition with each other, and lactic acid is a serial killer of E. coli.
Fred Breidt from the USDA’s Food Science Research Unit at North Carolina State University published a paper on this subject specifically in regard to lactic acid fermented cucumbers.
He says, “The presence of live growing cells of lactic acid bacteria, which are the ones that ferment pickles and cheese and a lot of things, actually in competition cause E. coli to die off rather quickly, because they produce things other than just the acid, that’s in the fermented foods. Lactic acid bacteria are highly efficient killers of other bacteria, and they do a marvelous job. This is why vegetable fermentations pretty much always works. It’s been working for thousands of years. It’s one of the oldest technologies known to man and it always works, and the reason is these lactic acid bacteria are very good at what they do, and we take advantage of that as a technology.” Source
While obviously you should follow proper food handling advice and I do think that longer ferments are safest, overall, it appears that you are more at risk getting sick from eating a salad than your lacto-fermented vegetables!
How to make fermented foods practical
I think the most important step to making cultured foods part of your everyday eating lifestyle is to figure out what fermented food is well liked by you (or your family), what is inexpensive enough to eat daily, and what is easy to make. Adding in just one fermented food is a great start, especially if you consume it on a regular basis. Adding in several will help ensure that you are getting the benefits from a wide variety of probiotic sources, as each has its own benefits – but that should be your long term goal, not your first goal.
We have often found it helpful, in really busy times, to simply buy locally made, raw, fermented vegetables. This is hardly the cheapest option, but it has allowed us to continue the practice of eating fermented foods when it was hard to keep my kitchen ferments up and running.
Fermented Vegetable Recipes
Sauerkraut (this is made using the traditional Russian method also used in the Wild Fermentation book. It’s pretty salty, so you can consider trying to cut down on the salt a little).