By Natalia Gill, from An Appetite For Joy
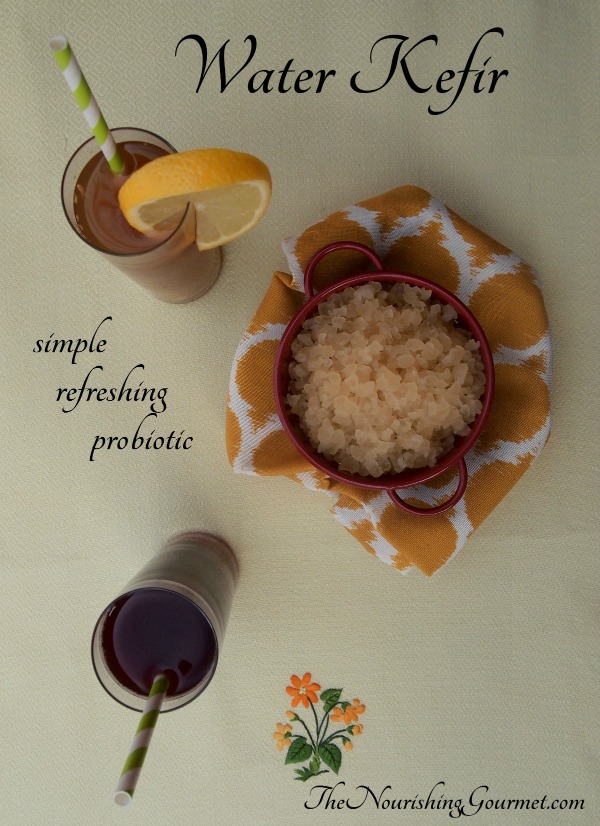
Water kefir is a lightly sweet and refreshing tonic, bubbling over with healthy bacteria (You can read about the health benefits of fermented foods here) . The taste is pleasant on its own or it can be elevated with an endless combination of flavors. Spicy lemon ginger and cultured grape soda are pictured here (our current favorites!)
As part of the 21 Steps to a Nourishing Diet Series, water kefir can be a nice segue into home fermentation. This cultured drink is very inexpensive to make, virtually fail-proof and packs a healthy wallop of probiotics. I can’t think of an easier, more instantly rewarding way to start fermenting.
Basic water kefir is made by dropping water kefir “grains” (which are not really grains at all but a symbiotic culture of bacteria and yeast or SCOBY) into sugar water and allowing it to ferment on the counter for a few days. The grains (which look like small, clear jellies) can be used over and over indefinitely, and usually multiply, allowing them to be passed on to others.
Our experience with water kefir
My family started drinking water kefir about a year ago. At the time, I was getting into home fermentation in an effort to get a wider range of probiotics into our diet. Probiotic-rich foods not only create a more favorable balance of gut flora, but amazingly, the bacteria work to physically repair the gut lining.
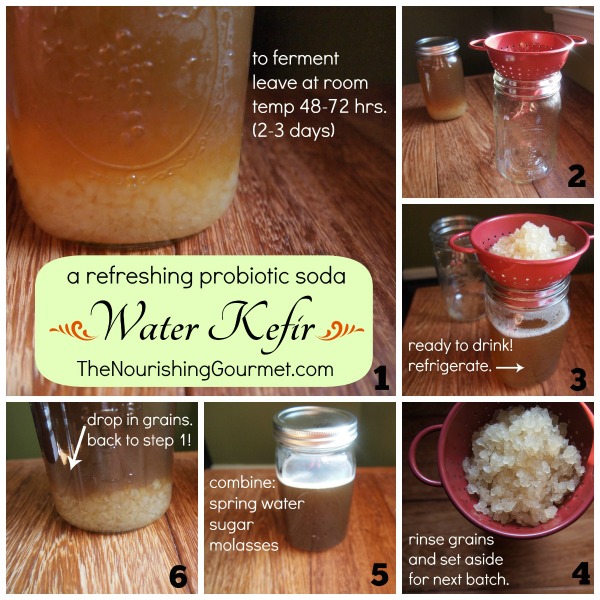
After purchasing a crock, I successfully (and to my surprise, quite easily) made this No-Pound Old Fashioned Lacto-Fermented Sauerkraut. I was preparing to embark on Continuous Kombucha Brewing when some water kefir grains dropped into my lap at the playground of my son’s school. Not literally, although wouldn’t that be something! They came freshly prepared by a friend in a wide-mouth quart-sized mason jar (as pictured in “step 1” below).
Several days later, I nervously strained the finished water kefir and reused the grains to make my first new batch. Within hours it started coming to life. I relaxed as the mixture bubbled away happily in a dark and formerly stagnant corner of my kitchen counter. It was fun to check in now and then, giving the mason jar a little twist to encourage bubbles to surface (I read later that this is a good thing to do if you think of it.) Plus, the taste was quite pleasant!
My children and I benefited right away. My 2-yr old daughter had recently snubbed her nourishing diet for a phase of picky eating that was starting to affect her digestion. Her digestion normalized after the first round of water kefir. I was also thrilled to be getting probiotics into my son again, who at the time did not like soured milk products or sauerkraut.
My husband obliged but never really noticed any benefit. If anything, he felt better without it, so he gave it up after a while. Lately though as I’ve been experimenting with new flavors, he’s been giving it another try. I’m wondering if the added complexity of flavored water kefir (the tang of cultured grape or the sour-spicy combo of lemon-ginger) will allow his body to receive it better. Taste does impact digestion.
Follow these step-by-step photos to brew your own water kefir
(see recipe for exact measurements and variations)
- If you receive grains from a friend, they will likely come mid-ferment as shown in Step 1.
- If you purchase dehydrated grains from a place like Cultures for Health, you will receive detailed instructions on how to rehydrate them, which will probably be very similar to the diagram below, but it may take a few rounds for the grains to recalibrate before your water kefir is enjoyable.
Questions and Answers about Water Kefir
What types of sugars can I use? What about coconut palm sugar, honey and maple syrup?
- Unrefined cane sugar is recommended with molasses (added and/or still intact) to provide minerals that the grains need. Lately I have been use sucanat (#affiliatelink) and my grains are thriving. However, I started with organic cane sugar (fine granulated) and that also worked well and is more cost effective. *With sucanat, I use a generous 1/4 cup + 1t molasses and ferment for 48 hours. With organic cane sugar I use a level 1/4 cup + 1t molasses and ferment for 72 hours.
- It is possible to use coconut palm sugar, honey and maple syrup as well (substituting equally) but over time the grains will weaken as the sugar makeup isn’t optimal. This should only be done when you your grains have multiplied and you have extra to experiment with. I recently experimented with honey and it made a nice drink, though the grains did not multiply as they usually do. Maple syrup may work better because it is typically not as antimicrobial as is honey.
How much should I drink?
As you might imagine, there are no hard and fast rules. We started out drinking an ounce or two after each meal. This was a good way to see how our bodies responded to it. You may want to start with even less if your diet doesn’t include a lot of fermented foods. Now we are a little more erratic, but I’d say we have about 2-6 ounces on most days. We sometimes take breaks by putting it into hibernation. It’s always wise to listen to your body and practice moderation, even with the good stuff.
Can I take a break from making it?
Yes! Grains can be put into hibernation mode or dehydrated. To hibernate, just mix up a new batch (as pictured in “step 6”) and stick it in the fridge instead of leaving it out to ferment. I’ve left mine there for almost a month with no problems but I’d suggest checking on them after 1-2 weeks as all grains are different.
I have yet to dehydrate our grains, but here is how to do it from what I understand. Rinse the grains with filtered water and spread them out between two sheets of parchment and leave in a safe, but ventilated place to dry out at room temperature for 1-4 days. You want them to be very dry. You can also use a dehydrator. They should keep for several months.
What is the alcohol content and is it safe for kids?
The alcohol content is very low – well below 1% which is less than overripe fruit. It climbs a little if using straight juice or when doing a second fermentation (as described in the recipe notes) but it would be a challenge to get even mildly intoxicated by drinking water kefir.
My children might drink it once or twice a day, in small 2-3 ounce glasses (less if it’s a second fermentation). It is an individual judgement call as there are no strong warnings against giving it to children. I did read once, in a book by Maria Montessori, that she did not recommend giving fermented drinks to children. I assume she was referring to alcohol, but it did make me take pause.
How much sugar remains after fermentation?
This is taken from the Q & A section about water kefir grains from Cultures of Health. “The sucrose is converted to glucose+fructose. The glucose is used by the kefir grains for grain-building and reproduction, and the fructose remains in the drink at about 20% of the original level. The longer the finished kefir sits, the less sweet it will be, so some fructose is apparently converted in that process as well.”
Where did kefir grains originate?
Water kefir is truly cosmopolitan. From Italy to the Far East to Mexico, various names and twists exist. It’s origins are unclear, but it is speculated to have originated in Mexico, where, according to research, “tibicos” culture forms on the pads of the Opuntia cactus (read more here). Milk kefir grains, which have a different composition, likely originated in the Caucasus Mountains region.
Do you have any questions or an experience to share? We would love to hear!
Original article and pictures take www.thenourishinggourmet.com site
Комментариев нет:
Отправить комментарий