I may receive a commission if you purchase something mentioned in this post. More details here.
Yep, I made nettles beer! We were drinking this very tasty beverage just two weeks after our afternoon foraging for stinging nettles. If you haven’t read any other home brew posts, I just want to remind you that I am a complete novice, and have just figured out how to do this on my own. Having some country brewing books is very handy (this is the one we have) and of course being able to look things up online is invaluable. Still, this process was very, very simple.
It helps that I have a wild yeast that I grew at home, one that is very eager and assertive. This makes everything faster, more exciting, and fairly unpredictable. You could definitely order a commercial yeast to use, follow a recipe, and get much more predictable results– either way is great, the important part is to get out there, pick the free and health-enhancing nettles, and start brewing!

Here’s the official ingredient list, with measurements:
What You’ll Need
In terms of supplies, there are a few basic items you should have. You can often find these on craigslist, and definitely at a brewing supply store, or you can order them on amazon. Keep in mind that you can re-use everything over and over again, once you have a few basics.
- Demijohns
- Airlocks with rubber stoppers
- a funnel
- Wine bottles (we usually just sanitize our old ones), corks, and a corker, OR swing-top bottles
This is what I did.
I took the big pile of nettles we had gathered, and rinsed them several times. I used gloves and tongs, and washed them in a bucket outside. I also poured some distilled vinegar in the tub to let them soak in, to help remove any unwelcome residues. After that, I set up two pots of water on the stove. I blanched the raw nettles in the first pot until they had wilted and lost their sting– about 30 seconds– and then put them in the big pot that I would use to brew my beer wort (tea, basically.) I blanched the nettles in batches, and once they were all in the big pot, I let them simmer for 20 minutes.Once the wort was brewed, I poured the tea out into the big bucket I had used.
Ok, let me stop right here and tell you that I sterilized everything. This is important. You have to sterilize the bucket, the bottles, the funnel– anything that will be touching the brew after it’s been boiled. It’s not hard— you can just buy home brew disinfectants that are made for this purpose. I tend to be a bit relaxed about this kind of thing in general, but I do sterilize.
Alright. To the bucket of tea, I added brown sugar and lemon juice. That is all! No grains, malts, hops, etc. It is very simple. The basics you need for any home brew are an herbal agent that offers the basic flavor and medium to brew in, and then sugar for the yeast to eat, and then some acid to balance things out. (If you were using a fruit with some nice acid in it already, then you wouldn’t need to add any.)
I let the wort cool in the bucket. Some people let the mixture stay in the bucket for a few days before decanting into the demijohns. I got impatient and also didn’t like the plastic smell of the bucket, and wanted to get it out of there sooner. To make up for doing this early, I had to rack it again a few days later, since keeping it in the bucket would have allowed more sediment to settle and not make it into the jugs.

Once it was cool, I put the liquid in the demijohn. There was extra, which I just poured into another glass bottle. I added the yeast culture, which was basically the dregs of an apple cider I had made a couple weeks before. This culture has lived many lives already, starting last summer as a strawberry kvass which picked up the cider yeast strain when I just covered it with fabric rather than putting an airlock on it. Since then, I have used it to make the blackberry “cider,” ginger beer, pear cider, and then most recently, apple cider from locally pressed apples. I always save some of the liquid and powdery stuff on the bottom to add to my next brew, and it has served me very well, so far! For basic instructions on getting a wild yeast of your own, look here.

Alright, so I added the yeast culture, and then put the rubber cork and airlock on it. I brought it inside to put by our radiator, where the temperature is not at all hot, but just warmer than the rest of our drafty house.

Within three days, the yeast was going kind of crazy. It kept overflowing, out through the airlock. I realize now that I probably should have left a lot more room between the liquid and the top of the bottle.

Since I already had to rack it again, this wasn’t a big deal– I just sterilized a new fermenting jug and syphoned it out. With all of the overflow, I was able to also fit the liquid in that extra bottle, so it was all consolidated.

I saved the last inch or so from each. Initially, I thought I would save this for another ferment, but the plastic lid kept blowing off of the jar, and so we drank that bit. At this point, the beer was definitely developing a beer-y flavor, but was just sweeter than we wanted. It was pretty promising, and there were clear hops-like flavors that we got excited about.

About a week later, it was ready to decant into bottles. The timing was based on wanting more fizz and fermentation, but not wanting the mixture to run out of sugar to metabolize. So bottling it when it was just a little sweeter than I wanted, with some fizz going and a nice flavor was about right. After siphoning it into bottles, I put those back over by the radiator for three days, allowing the last bit of sugar to be turned into more alcohol and carbonation. We took the last bit of beer, leaving the lees (yeasty sludge)– some of which I have already added to my next brew, and put it into a couple of wine bottles and corked them. Because they contained more yeast culture than the rest, they developed really quickly, and became super fizzy within a day or so.As I said at the beginning, just two weeks after picking the nettles, we were drinking the beer. And I wish you could come over and try it, because it is really, really good! Both Jeff and I were surprised and impressed by the good flavor and the very beer-like character, all without any of the usual beer ingredients. Nettles totally work– and gave it a flavor similar to an IPA! And using brown sugar added some extra dimension. I totally recommend it. So, this is what it looks like:
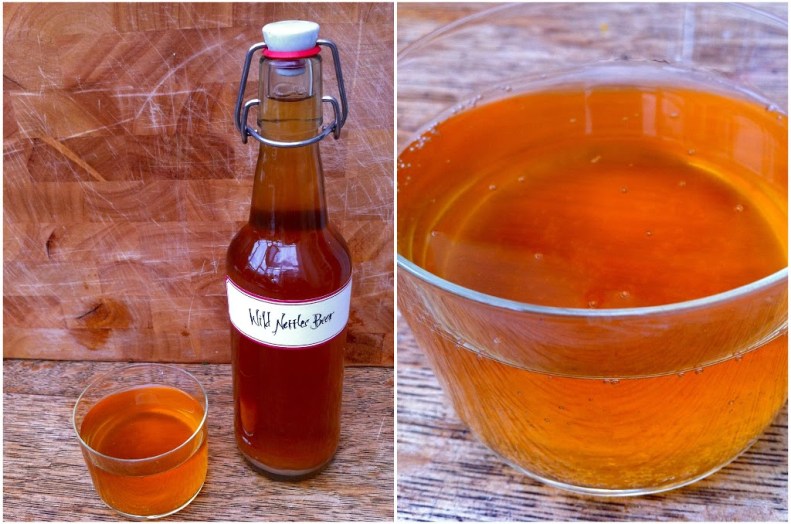
If you look closely, you’ll see that there is still yeast in the bottle, it just settles to the bottom. It’s nice and fizzy!

I think we may go out foraging again this weekend, so we can start another batch! I also wanted to mention that after I cooked the nettles, I strained them and pureed them to use for cooking. We made a really nice Nettles & Roasted Garlic dip (like a traditional spinach dip) and I plan to use the ones I froze to make a nettles soup, and maybe a nettles version of saag paneer. Here are some more nettles recipes.So this experience of making nettles beer provided a really pleasant afternoon out gathering, plenty of greens to eat, and a wonderful beer!Have you ever brewed your own beer or wine? Do you think you’ll give it a shot?
Did you like this post? Share it and pin for later!


Original article and pictures take andhereweare.net site
Комментариев нет:
Отправить комментарий